Your First 7 Days with a New Aquarium: A No-Stress, Day-by-Day Guide
Hello fellow fish keepers! That brand-new tank can feel equal parts exciting and overwhelming. You’re not alone if you’re staring at the empty glass wondering what to do first.
This guide walks you through the first critical week, turning that nervous energy into confident action. We’ll cover:
- Day 1: The foundational setup and water preparation.
- Days 2-3: Monitoring your new aquatic environment closely.
- Days 4-7: Recognizing and responding to your tank’s first biological signals.
I’ve spent years cultivating thriving planted tanks and breeding fish, learning these lessons firsthand.
Day 1: Setting the Foundation – Aquarium Setup
Essential Equipment to Set Up
Unpack your gear and place the tank on a sturdy, level stand that can handle the weight—water is heavy, about 8.3 pounds per gallon. I always start by rinsing the substrate with plain water to remove dust, which keeps your water clearer from day one. Position your filter and heater, but don’t plug them in yet. For a standard 20-gallon community tank, a hang-on-back filter and a 100-watt adjustable heater work reliably. In a cold-water setup you’ll typically skip the heater and rely on stable room temperature. Keep a thermometer in the tank to monitor temperature shifts. Add any decorations or rocks you’ve chosen, ensuring they’re aquarium-safe and won’t leach harmful chemicals.
- Filter: Select one rated for at least double your tank size; for a 10-gallon tank, use a filter made for 20 gallons.
- Heater: Set it to a stable temperature, like 76-78°F for tropical fish, and use a separate thermometer to verify.
- Substrate: Go for 1-2 inches of fine gravel or sand, which helps plant roots anchor and supports bottom-dwellers like corydoras.
- Decor: Include hiding spots-driftwood or PVC pipes cut in half-to reduce stress for shy fish.
Filling and Treating the Water
Lay a small plate or bowl on the substrate to pour water onto; this prevents the gravel from scattering. You must use a water conditioner to neutralize chlorine and chloramines, which can kill beneficial bacteria and harm fish gills instantly. Fill the tank slowly with room-temperature tap water, aiming for about an inch from the top to allow space for displacement. If your tap water is hard, consider mixing in reverse osmosis water to achieve a pH near 7.0 for most community fish. Double-check that all equipment is submerged or installed correctly before moving to the next step.
- Place a clean plate on the substrate to disperse water flow.
- Fill the tank halfway, then add water conditioner as per the bottle’s instructions-usually 1 teaspoon per 10 gallons.
- Complete filling, and gently stir the water to distribute the treatment evenly.
Initial Lighting and Safety
Plug in your LED or fluorescent light, but limit it to 6-8 hours today to discourage early algae blooms. Keep the tank away from direct sunlight and drafts, which cause temperature swings and green water outbreaks. I like to use a timer for consistency—it mimics natural day-night cycles and prevents forgetfulness. For a planted aquarium, balancing light with nutrients is essential to keep algae in check. Keeping nutrient levels stable supports healthy plant growth and helps suppress algae. Ensure all cords are dry and routed safely from water sources, and do a quick check for leaks around the tank seams. If you have curious pets or kids, consider a tank cover to prevent accidents.
- Lighting: Start with a low photoperiod; increase gradually over the week.
- Safety: Use a GFCI outlet to protect against electrical shocks.
- Stability: Verify the heater is fully submerged to avoid cracking or overheating.
Day 2: Kickstarting the Cycle – Introducing Beneficial Bacteria
Understanding Aquarium Cycling
Think of aquarium cycling like building a tiny waste-treatment plant inside your tank—it converts toxic fish waste into safer substances. The nitrogen cycle begins when ammonia from fish respiration and decaying matter is broken down by bacteria into nitrite, then nitrate. Without this process, ammonia spikes can burn fish gills and lead to fatalities within days. In a new tank, you’re essentially growing these bacteria colonies on surfaces like filter media and gravel. I explain it to beginners as a “bacterial bloom” that needs food (ammonia) and time to mature. This is the cycle your new aquarium—the nitrogen cycle explained in simple terms. Understanding it helps you time feeding and stocking as the bacteria colonies establish.
Ammonia levels should ideally be 0 ppm, but during cycling, they’ll rise and fall. Patience is your best tool here; rushing can crash the cycle and harm future fish. This biological filtration is what keeps your water crystal clear and your fish healthy long-term.
Using Biological Starters and Test Kits
Add a quality biological starter liquid or powder directly into the filter area where water flow is highest. I’ve had great success with products containing live nitrifying bacteria, which can shorten the cycling time from weeks to just a few days. Shake the bottle well and dose according to your tank volume-for a 30-gallon tank, that’s typically 30 mL. Simultaneously, use a liquid test kit (not strips, as they’re less accurate) to check ammonia, nitrite, nitrate, and pH. Record these numbers in a log to track progress.
- Shake the bacterial starter vigorously and pour it near the filter intake.
- Test water parameters: aim for ammonia below 0.25 ppm, nitrite at 0 ppm, and pH between 6.5 and 7.5.
- Repeat dosing as directed, usually daily for the first week.
Daily Monitoring Steps
Make it a habit to check your tank each morning-look for cloudiness, which is normal bacterial growth, and listen for unusual filter hums. Test ammonia and nitrite levels every 24 hours; if they exceed 1 ppm, perform a 25% water change to dilute toxins. Keep the filter running non-stop to oxygenate water and support bacteria. Note any temperature fluctuations; even a 2-degree drop can stress developing microbes. I also peek at the substrate for debris buildup, gently vacuuming if needed, but avoid disturbing the gravel too much early on.
- Water tests: Use a liquid kit to measure ammonia, nitrite, and nitrate.
- Visual checks: Watch for white haze (bacterial bloom) or film on surfaces.
- Equipment: Ensure filter flow is strong and heater indicator light is on.
- Adjustments: Add more bacterial starter if ammonia remains high after 48 hours.
Days 3-4: The Waiting Game – Monitoring Water Parameters
The initial setup excitement has faded, and now your tank enters its most critical phase. Nothing seems to be happening, but beneath the surface, an invisible world is waking up. This is the period where your diligence truly defines your future success.
Key Water Tests to Perform
You need to know what’s happening in your water. Guessing isn’t an option. I use a liquid test kit every single day during this stage.
- Ammonia: This is your starting pistol. You should see a reading between 0.5 and 2.0 ppm (parts per million). No ammonia means the cycle hasn’t begun.
- Nitrite: This is the second stage. A zero reading is normal for now, but keep testing. Its rise is your next big milestone.
- Nitrate: You won’t see this yet, but testing for it gets you in the habit. Its eventual appearance is the final victory flag.
- pH: Check it now to establish your baseline. A stable pH is more valuable than a “perfect” one that swings wildly.
Adjusting and Maintaining Balance
Seeing ammonia can be scary, but it’s a sign of life. Your job is to manage it, not panic.
- If ammonia exceeds 4.0 ppm, it can stall your cycle. Perform a 25% water change with temperature-matched, dechlorinated water to bring it down.
- Keep your filter running 24/7. Turning it off even for a few hours can kill the new bacteria you’re trying to cultivate.
- Leave your substrate and decorations alone. Resist the urge to vacuum or scrub, as this is where your beneficial bacteria are setting up camp.
A stable environment, even with some ammonia, is far better for bacterial growth than one with constantly changing parameters.
Observation and Early Problem Signs
Your eyes are powerful tools. Look beyond the test tubes.
- Cloudy Water: A milky haze is a classic sign of a bacterial bloom. This is usually good and means your cycle is progressing. It should clear on its own in a day or two.
- Funky Smells: A healthy tank should smell faintly earthy or have no odor at all. A strong, rotten egg smell indicates decaying organic matter and a lack of oxygen, demanding immediate attention.
- Watch for a white, fuzzy fungus growing on driftwood. This is normal and harmless; it will disappear once your clean-up crew (like shrimp or snails) is added later.
Trust the process, even when the water looks a little cloudy and your tests show things you don’t want to see. This is all part of the journey.
Days 5-6: Fine-Tuning and Problem Solving
You’re in the home stretch. The initial bacterial bloom has likely cleared, revealing your aquascape in all its glory. Now, we shift from passive waiting to active problem-solving.
Addressing Common New Tank Issues
Here’s how to tackle the most frequent headaches that pop up this week.
- Persistent Cloudiness: If the water is still milky after Day 4, your filter might be underpowered. Double-check its flow rate or consider adding a small pre-filter sponge to boost biological filtration.
- Surface Scum: A greasy film on the water’s surface blocks oxygen exchange. Increase surface agitation by pointing your filter output slightly upward or adding an air stone. You can also lay a paper towel on the surface for a second to soak it up-a simple but effective hack.
- Early Algae Spots: A dusting of brown diatoms on glass and decor is completely normal in new tanks. This is often due to silicates leaching from new substrates and will pass. Wipe the front glass, but leave the rest for your future clean-up crew.
Don’t reach for algaecides or other chemical quick-fixes; they often harm the delicate balance you’re trying so hard to build.
Preparing for Fish Addition
Your first fish are on the horizon. Let’s get everything ready for their arrival.
- Confirm Your Cycle: Your ammonia should be dropping, and you should see the first trace of nitrites. This two-part shift is the clearest confirmation your tank is cycling correctly.
- Perform a Final Water Change: Do a 30-40% water change to reduce any accumulated nitrate and refresh mineral content. This gives your new fish the cleanest possible start.
- Acclimate Gently: Plan to use the drip acclimation method. It’s slower but drastically reduces stress on the fish by gradually introducing them to your specific water chemistry.
- Choose Your First Fish: Start with a small group of hardy, peaceful fish. Think about a school of six Zebra Danios or a trio of Platys. They will produce the waste needed to feed the bacterial colony without overloading it.
Seeing that first nitrite reading feels like a scientific breakthrough-it’s the moment you know your miniature ecosystem is truly coming to life.
Day 7: Welcoming New Friends – Adding Your First Fish
Drip Acclimation Process
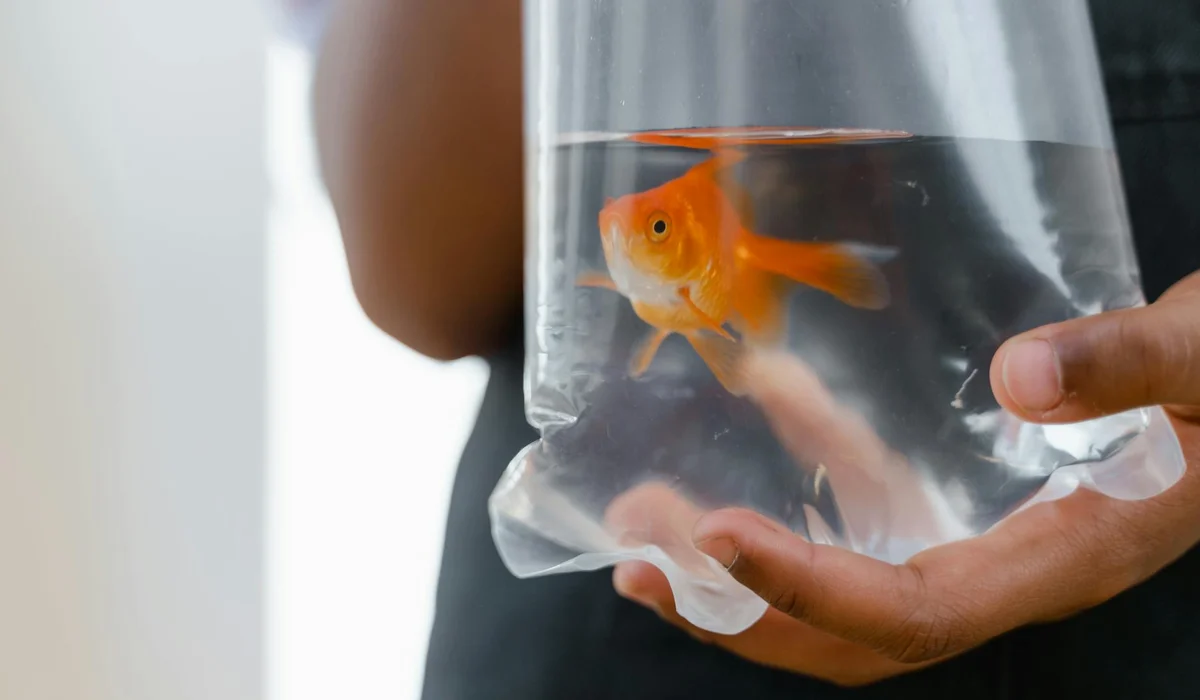
This is the moment you’ve been waiting for, but patience is your best tool. I never just float and dump my fish; I always use drip acclimation to gently introduce them to my tank’s specific water chemistry.
- Turn off your aquarium lights to reduce stress for both the new and any existing fish.
- Float the sealed fish bag in your tank for about 15 minutes to equalize the temperature.
- Carefully pour the bag’s water and the fish into a clean bucket. Be gentle to avoid shocking them.
- Use airline tubing and a control valve to start a siphon from your main tank to the bucket. Tie a loose knot in the tubing to slow the flow to a steady 2-4 drips per second.
- Let this process run for at least 45-60 minutes. This slow drip allows the fish to adjust to your tank’s pH and hardness without osmotic shock.
- After the time is up, gently net the fish from the bucket and release them into your tank. Do not pour the bucket water into your aquarium.
Drip acclimation is the single most effective way to prevent transfer shock, giving your new pets the best possible start in their new home.
Post-Addition Care and Feeding
Your new fish will likely hide and seem shy for the first few hours. This is completely normal behavior. Resist the urge to stare or tap on the glass.
- Skip the First Meal: Do not feed your new fish for at least 5-6 hours after they are in the tank. Their digestive systems need time to settle from the move.
- First Feeding: Offer a tiny, pea-sized amount of high-quality food. Watch to see if they eat. Remove any uneaten food after two minutes to keep the water pristine.
- Observe Closely: Keep an eye on their fins, breathing, and how they interact with the environment. A little hiding is fine, but listlessness or rapid gill movement can be a red flag.
- Maintain the Routine: Keep your light cycle consistent, but maybe reduce the photoperiod by an hour or two for the first day to ease them in.
Overfeeding a new tank is the fastest way to spike ammonia and undo all your careful cycling work, so when in doubt, feed less.
First Week Survival Tips – Avoiding Common Pitfalls
Common Mistakes and How to Avoid Them
I’ve made plenty of these errors myself, so learn from my mishaps to keep your tank thriving.
- The Overcleaning Frenzy: Scrubbing everything weekly destroys the beneficial bacteria you worked so hard to cultivate. Only rinse filter media in old tank water you remove during a water change, never under the tap.
- Too Many Fish, Too Fast: Your filter’s bacteria colony is still small. Adding a large group of fish at once can cause a deadly ammonia spike. Stick with a few small, hardy starters.
- Ignoring Water Tests: Just because the water looks clear doesn’t mean it’s safe. Test your water parameters every other day this first week to catch any invisible chemical imbalances early.
- Chasing the “Perfect” pH: Using chemicals to constantly adjust your pH causes more instability than just keeping it consistent. Most common fish adapt well to a stable pH, even if it’s not the textbook “ideal.”
A stable, slightly off pH is always better for your fish than a perfect but constantly swinging pH.
Building a Simple Maintenance Plan
Consistency is the secret to a low-stress, beautiful aquarium. Here is a straightforward plan to follow after your intense first week.
- Daily: Visually check that equipment (filter, heater) is running. Do a quick headcount of your fish. Feed a small, controlled amount.
- Weekly: Perform a 15-25% water change. Use a gravel vacuum to siphon waste from the substrate. Wipe the inside glass with an algae scrubber. Test your water parameters.
- Monthly: Inspect your filter. Give impellers a quick clean and rinse mechanical filter media in removed tank water. Trim any overgrown plants. Check your heater’s temperature setting with a separate thermometer.
Setting a weekly alarm on your phone for a small water change is the easiest habit you can build for long-term aquarium success. Knowing which maintenance tasks are essential and how often to perform them helps you establish a dependable routine. By matching frequency to your tank’s needs, you can keep water quality steady.
Common Questions
Should I add fish during the first week?
It is generally not recommended to add fish during the first week. Your tank’s biological filter needs time to establish a colony of beneficial bacteria to process fish waste. Adding fish too soon can lead to a rapid, harmful buildup of toxic ammonia. Additionally, test the water parameters before adding new fish. Ammonia and nitrite should be at or near zero, with nitrate kept low and pH stable.
How do I prevent algae in the first week?
To prevent early algae growth, limit your tank’s lighting to 6-8 hours per day. Ensure the aquarium is not in direct sunlight, as this can trigger algae blooms. Overfeeding is a major contributor to algae, so be very cautious with food amounts if you have added any fish. If you have live plants, the question how long should aquarium lights be? becomes more nuanced. Planted tanks often benefit from longer, steady lighting (around 8-10 hours) while still avoiding excessive light that fuels algae.
What are common mistakes in the first week of an aquarium?
Common mistakes include adding too many fish at once, which overwhelms the new filter, and overcleaning the filter media with tap water, which kills beneficial bacteria. Another frequent error is overfeeding, which pollutes the water before the nitrogen cycle can handle the waste. These are among the most common mistakes when adding new fish. Avoiding them helps new fish thrive and keeps the tank stable.
How long should I wait before adding fish after setup in the first week?
While the full aquarium cycle can take several weeks, you should wait until you see clear signs of a working nitrogen cycle before adding any fish. This typically means waiting until after the first week, once you observe ammonia levels dropping and nitrite levels beginning to rise, confirming that the beneficial bacteria are establishing themselves.
Your Journey Has Just Begun
Your first week is all about patience and observation, letting the filter hum and the water clear while you test parameters daily. Resist the urge to make big changes; stability is the greatest gift you can give your new aquatic ecosystem.
Remember, a thriving tank is a long-term commitment that rewards your consistent care with a beautiful, living piece of art. Stay curious, keep learning about your fish’s specific needs, and enjoy every step of creating a healthy underwater world. Using a month-by-month aquarium care plan helps you stay on track all year. A full-year planner makes it easier to schedule maintenance, tests, and changes for a thriving tank.
Further Reading & Sources
- New Fish Checklist: How to Set Up a Fish Tank for Beginners – Aquarium Co-Op
- Freshwater Aquarium Setup: A Step-by-Step Guide for Beginners
- Starting A New Aquarium – What to Expect In The First 60 Days
- How to setup an aquarium
- Beginner’s guide to setting up your first aquarium
Lia is an expert in aquarium and pet fish care. Having worked in the marine industry and having cared for multiple pet fish, she has acquired first hand expertise on aquarium care, maintenance and setup. She always brings her practical expertise and science to help solve any aquarium related queries.
Water Changes