The Essential Guide to Moving Your Fish Tank Safely
Hello fellow aquarists. I know that pit-of-your-stomach feeling when you realize you have to move your entire aquatic ecosystem. It’s daunting, but with the right gear and a solid plan, your fish can thrive through the transition.
This guide walks you through everything you’ll need, from the absolute must-haves to the clever hacks that make life easier. We will cover: how to safely transport your fish, prepping your tank and equipment for the journey, and the crucial steps for re-acclimating everyone in their re-established home.
I’ve moved multiple high-tech planted tanks across states, keeping sensitive fish like my betta, Captain Fin, and shy corydoras healthy and stress-free every time.
Your Essential Fish Tank Moving Supplies Checklist
Water Management Must-Haves
Buckets and Siphon Hoses
You will need several clean, food-grade buckets reserved only for aquarium use. Dedicate at least one bucket for every 10 gallons of tank water to ensure you can save enough during the move. A siphon hose with a gravel vacuum attachment lets you drain water while cleaning debris from the substrate, which I find prevents cloudy resettling. The gentle hum of water flowing into buckets signals the start of a smooth transition.
- Choose 5-gallon buckets for easy handling.
- Use a siphon to avoid stirring up waste that could stress fish like Shadow.
- Label buckets “Old Tank Water” to keep your biological balance intact.
Water Conditioner and Dechlorinator
Tap water contains chlorine that can harm fish gills, so a quality dechlorinator is non-negotiable. I always double-dose conditioner in new water to neutralize chloramines and heavy metals, especially for sensitive species like bettas. The instant clarity it brings to freshly filled buckets gives me peace of mind that Captain Fin’s vibrant colors won’t fade from stress.
- Look for conditioners that detoxify ammonia during the move.
- Keep a small bottle handy for last-minute water top-offs.
- Test pH after conditioning; aim for a stable 6.5-7.5 for most community tanks.
Fish Transport Gear
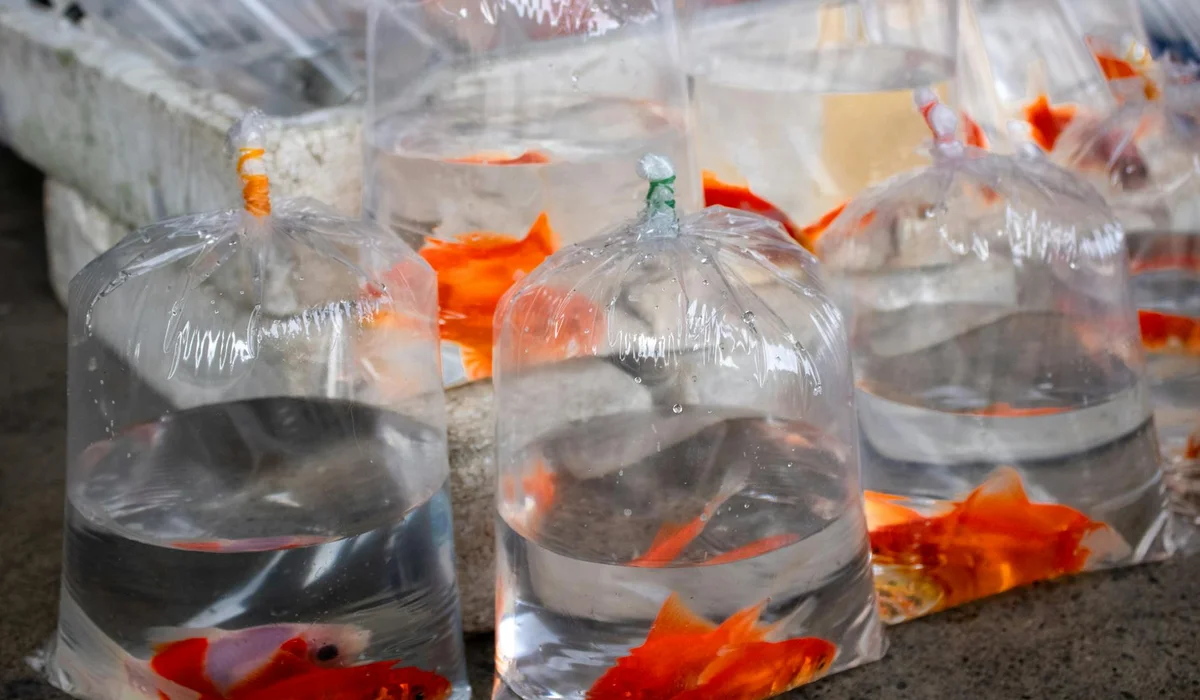
Transport Containers: Bags and Plastic Bins
For short moves, fish bags from your local store work well, but for longer trips, sturdy plastic bins are safer. I use a dark-colored bin for Goldie to reduce visual stress and prevent jumping. Bags are ideal for small fish like Captain Fin, but bins offer more stability and room for aeration devices. The shimmer of scales in a well-chosen container means your fish are comfortable.
- Bags: Double-bag fish with pure oxygen for trips under 2 hours.
- Bins: Select ones with secure lids and enough space for fish to turn easily.
- Avoid overcrowding; allow 1 gallon per inch of fish length.
Aeration Tools: Air Pumps and Sponges
Oxygen levels drop quickly in transport, so a battery-operated air pump with an air stone is a lifesaver. Adding a pre-cycled sponge filter to the container maintains beneficial bacteria and keeps water clean. I’ve seen fish like Shadow become more active with gentle bubbles providing aeration during moves. The soft hum of the pump reassures me that everyone is breathing easily.
- Use sponge filters from your main tank to seed good bacteria.
- Test battery life before the move to avoid failures.
- Place air stones away from fish to prevent injury from strong currents.
Aquarium Packing Supplies
Protective Materials: Towels and Moving Blankets
Glass aquariums are fragile, so wrap them in thick towels or moving blankets to prevent cracks. I layer towels on the bottom and sides of the tank to absorb shocks during transport. The soft padding reminds me of how I cushioned my first 30-gallon tank, and it arrived without a scratch. Keep everything dry to avoid slips.
- Use microfiber towels to avoid lint in the tank later.
- Cover the entire exterior, focusing on corners and seams.
- Secure blankets with tape, but never stick anything to the glass itself.
Stabilizing Items: Foam Padding and Zip Ties
Foam boards or padding inside the tank can protect glass from shifting decor, and zip ties keep cords and hoses tidy. Cut foam to fit the tank bottom; this prevents hard objects from tapping the glass during bumps. I zip-tie filter tubes together so they don’t tangle, making reassembly faster. The snug fit of foam gives me confidence nothing will shift en route.
- Use aquarium-safe foam to avoid chemical leaching.
- Bundle equipment with zip ties for easy identification later.
- Label everything with masking tape for a quick setup.
How to Use Supplies for Preparing Your Fish and Water
Step 1: Gather Your Water Care Kit
- Place buckets, siphon hose, and water conditioner in one accessible spot.
- Fill buckets ⅔ full with old tank water to preserve beneficial bacteria.
- Add dechlorinator to any new water you might need, following bottle instructions for dosage.
Having your water kit ready before you start draining prevents rushed mistakes that could harm water quality. I always mix conditioner in a separate bucket first to ensure even distribution, watching the water turn crystal clear. This step sets the stage for a healthy move.
Step 2: Safely Remove and Hold Your Fish
- Use a soft net to gently catch fish, starting with the most active ones like Captain Fin.
- Transfer them to prepared transport containers with aerated tank water.
- Keep containers in a dark, quiet area to minimize stress during the move.
Move fish last and acclimate them slowly to avoid shock from temperature or pH changes. When I relocated Shadow, I dimmed the lights and added a familiar plant to his bin, which kept him calm. The gentle slosh of water in their temporary home tells me they are secure until settling in.
Supplies for Safe Fish Transport During the Move
Choosing the Right Transport Container
Your fish’s temporary home for the move is not the place to cut corners. I’ve tried various methods over the years, and the right container makes all the difference in their stress levels.
- 5-Gallon Buckets with Lids: These are my go-to for most freshwater community fish. They are durable, affordable, and hold a large volume of water to dilute waste. Just make sure they are brand new or have only ever been used for aquarium-related tasks to avoid chemical contamination.
- Specialized Fish Transport Bags: For sensitive fish like my betta, Captain Fin, or for longer journeys, thick, professional-grade poly bags are best. Double-bag them, fill one-third with tank water, and inflate with pure oxygen from your local fish store before sealing with rubber bands.
- Insulated Styrofoam Coolers: This is your secret weapon. Placing your buckets or bags inside a cooler buffers temperature swings dramatically. It keeps the water stable for hours, protecting your fish from sudden chills or heat.
- Clear Plastic Containers with Secure Lids: Useful for shorter moves, but ensure the lid has air holes or is not sealed completely tight to allow for gas exchange. Avoid containers that have held any non-food items.
Matching the container to your specific fish and travel time is the first step to a successful relocation. To ensure the safest way to transport fish during a move, use a properly sized, secure container with stable temperature control. Minimize movement and prevent leaks by packing carefully and securing the container during transit.
Keeping Your Fish Comfortable on the Go
The journey itself can be jarring, but a few simple supplies will create a much smoother experience for your aquatic friends. Think of it as creating a mobile zen den.
- Battery-Powered Air Pump: This is non-negotiable for trips over an hour. Oxygen levels can deplete quickly in a confined space. A small battery-operated air pump with an air stone will keep the water properly oxygenated.
- Water Conditioner: Always have a bottle of your preferred dechlorinator on hand. If you need to add a splash of new water during the trip, you can make it safe instantly.
- Fish Net: Have a dedicated, soft-mesh net ready for gently transferring fish in and out of their transport containers. Avoid using household kitchen strainers at all costs.
- Dark Towels or Sheets: Covering the transport containers with a dark cloth reduces visual stress for the fish. The dim environment helps keep them calm and prevents them from seeing movement outside their temporary home.
Minimizing stress is not just about comfort; it directly impacts their immune system and ability to settle into the new tank. I never move fish without first fasting them for 24 hours; this reduces the ammonia they produce in their transport water. During acclimation, watch for signs of stress during acclimation such as flashing, gasping at the surface, or not feeding. Recognizing these signs early helps you adjust the tank setup and care to support a smoother transition for the new fish.
Packing and Moving the Aquarium Tank with the Right Gear
Step 1: Empty and Clean the Tank
This is where the real work begins, but having the right gear turns a daunting task into a simple process. The goal is to preserve your tank’s biological balance while getting it ready for transport.
- Siphon and Save Tank Water: Use your aquarium gravel vacuum and several of those 5-gallon buckets to siphon out 50-70% of the tank water. You will use this established water to refill the tank later, which helps stabilize the environment for your fish.
- Remove and Rinse Decorations: Take out rocks, driftwood, and plastic decorations. Give them a quick scrub in the bucket of old tank water you just removed. Never use soap or tap water, as the chlorine can kill the beneficial bacteria living on them.
- Handle Substrate with Care: If you have a planted tank or a deep substrate bed, you only need to give the top layer a light stir with the gravel vac to remove debris. The substrate itself is a powerhouse of beneficial bacteria, so you want to disturb it as little as possible.
Preserving that original tank water is like saving a piece of their home, making the final setup far less shocking for your fish. Leave just enough water to keep any live plants wet. When you add water back slowly, do it slowly and with a dechlorinator to keep your fish safe. Also aim to match the water temperature to the tank to prevent shocks.
Step 2: Secure Equipment and Decorations
Now, you need to pack the tank itself and all its components. Haphazard packing is a surefire way to arrive with broken glass and shattered equipment.
- Original Packaging is King: If you saved the styrofoam and cardboard box your tank came in, you’ve already won. This is the safest way to transport a glass or acrylic aquarium.
- Moving Blankets and Bubble Wrap: For the rest of us, wrap the entire tank in moving blankets or thick bubble wrap. Place it in a cardboard box and fill any empty space with crumpled paper or more packing material to prevent shifting.
- Pack Filters Smartly: For hang-on-back or canister filters, place the media (sponges, ceramic rings) in a sealed bag or container with some tank water. This keeps the vital bacteria alive. Wipe down the filter body and pack it separately with plenty of cushioning.
- Heaters and Delicate Items: Glass heaters are incredibly fragile. Wrap them individually in bubble wrap and pack them in a small, rigid box. Do the same for your thermometer and any other glass accessories.
I learned the hard way that a loose heater rolling around in a box almost always ends in a cracked tube and a potential safety hazard. Taking ten extra minutes to pack carefully saves you money and heartache later.
Setting Up Your Tank After the Move with Essential Supplies
Reassembling Your Aquarium Step by Step
Start by placing your clean tank on a level, sturdy surface to prevent cracks and leaks. I always double-check the stand’s stability with a spirit level before adding any weight, as a tilted tank can strain seals and lead to disasters. A level stand also helps ensure even water distribution across the base. This reduces uneven pressure on seals and supports stable filtration. Next, add your rinsed substrate—about 1-2 inches deep for most planted setups—and gently slope it toward the back for visual depth.
Slowly pour in your saved or dechlorinated water to avoid disturbing the substrate. Using a plate or bowl to diffuse the water flow keeps the sand or gravel from clouding up the tank instantly. Reinstall your filter media, heater, and other equipment, but wait to plug them in until everything is settled.
- Position hardscape like rocks and driftwood first for a solid foundation.
- Add live plants, anchoring roots firmly in the substrate to prevent floating.
- Fill the tank to about 75% full, then arrange decorations to create hiding spots.
- Top off the water, leaving an inch of space at the top for gas exchange.
- Turn on equipment and monitor temperature until it stabilizes at 78°F for tropical species like bettas.
Let the tank run for at least an hour to ensure all systems are working smoothly. This waiting period allows debris to settle and gives you a chance to spot any leaks or malfunctions early on. I learned this the hard way when moving Shadow’s tank; a loose hose connector caused a small flood that stressed us both out.
Reintroducing Your Fish Gently
Float the sealed fish bags in the tank for 15-20 minutes to equalize temperature. Gradual temperature matching prevents thermal shock, which is a common killer during tank transitions. After floating, open the bags and add small amounts of tank water every 10 minutes over 30-40 minutes to acclimate them to new water chemistry. How long should you float fish bags before releasing?
Use a soft net to transfer fish instead of pouring bag water into the tank. Avoid introducing old water to minimize the risk of contaminating your freshly set-up aquarium with waste or pathogens. When performing a water change, add the new water slowly and ensure it matches the tank’s temperature to avoid shocking your fish. For more detailed guidance, check out this resource on performing a water change. For sensitive fish like Captain Fin, I dim the lights and keep noise low to reduce stress during this process.
- Start with hardy fish first, like Corydoras, before adding more delicate species.
- Observe fish for signs of distress, such as rapid gill movement or lethargy.
- Wait 24 hours before feeding to let their digestive systems adjust.
Keep an eye on water parameters like ammonia and nitrite for the first week. Testing daily helps catch any mini-cycles early, especially if beneficial bacteria were disturbed during the move. When I reintroduced Goldie after a move, I noticed a slight ammonia spike and did a 25% water change immediately to keep her safe.
Pro Tips for a Successful Fish Tank Relocation
Timing and Temperature Control
Plan your move for early morning or late evening when temperatures are stable. Extreme heat or cold can shock fish and equipment, so aim for a day with mild weather between 65°F and 75°F outdoors. Use insulated coolers or battery-operated heaters to maintain water temperature during transport, especially for tropical fish that need 76-80°F.
Monitor the tank’s temperature with a reliable digital thermometer throughout the process. Sudden drops or rises of more than 2-3 degrees can weaken fish immune systems and lead to illness. I always pack a spare heater and pre-warm the car in winter moves to avoid chilling Captain Fin’s water.
- Keep fish in dark containers to reduce stress and limit temperature fluctuations.
- Move during low-traffic times to avoid delays that could affect water quality.
- Check local weather forecasts and avoid rainy or windy days that complicate logistics.
Minimizing Stress for Fish and Keeper
Prepare a “fish first aid kit” with water conditioner, nets, and backup batteries for air pumps. Having essentials on hand turns potential panic moments into manageable fixes, saving both fish and your sanity. I include stress coat additives for fish like Shadow, who tend to hide more after a move.
Limit noise and vibrations by placing tanks on padded surfaces during transport. Loud sounds can disorient fish and increase cortisol levels, making them prone to disease. For the keeper, enlist a friend to help with heavy lifting and set a realistic timeline to avoid rushing.
- Fast fish for 24 hours before the move to reduce waste in transport containers.
- Label all bags and boxes clearly to streamline setup at the new location.
- Take short breaks during reassembly to stay calm and focused-your fish sense your energy.
After the move, resist the urge to constantly check on the tank. Giving the ecosystem a day to stabilize without interference encourages fish to explore and settle in naturally. When I moved Goldie’s tank last year, I waited until the next morning to do a water test, and the parameters were perfect thanks to this patience. Once things are settled, run a quick water test to verify key parameters like pH, ammonia, nitrite, and nitrate. Regular testing helps you maintain proper water parameters in your aquarium.
Common Questions
What are the basic fish tank supplies I need for a move?
The absolute basics include clean buckets, a siphon hose, a water conditioner, and secure transport containers. You will also need protective materials like towels and battery-powered air pumps to keep your fish safe and oxygenated during the journey. Having these core items ready is the first step to a successful relocation. For a more detailed rundown, check out our Essential Equipment for a Home Aquarium.
Can I buy fish tank supplies online?
Yes, many reputable online retailers specialize in aquarium supplies, offering a vast selection of buckets, water conditioners, and transport gear. Shopping online is convenient for comparing prices and reading reviews from other aquarists to ensure you get quality products delivered to your door.
Does Walmart carry fish tank moving supplies?
Walmart typically carries many essential items like food-grade buckets, plastic storage bins, and siphon hoses in their pet care and household sections. While their selection of specialized aquarium equipment may be limited, they are a good resource for basic moving containers and supplies in a pinch.
Are there wholesale options for fish tank supplies?
Yes, wholesalers and some online bulk suppliers offer larger quantities of items like buckets, nets, and water conditioners at reduced prices. This can be cost-effective for aquarium clubs, multi-tank owners, or those planning a very large-scale move and needing to stock up on essentials.
Ready for a Smooth Move?
The most successful tank moves happen when you prepare a holding tub for your fish and save as much of the original tank water as possible. Pack your filter media in tank water, and remember that slow, careful re-acclimation is the final, crucial step to getting everyone settled. This step-by-step guide will walk you through the process of setting up your fish tank after a move.
Moving an aquarium is a big responsibility that truly tests your skills as a fish keeper. If you’re unsure how to do it safely, follow a complete step-by-step guide for moving and transporting a fish tank. This approach helps protect your fish and gear during prep, transport, and setup. Embrace the process as a learning experience, and let it deepen your appreciation for the delicate ecosystem you work so hard to maintain.
Further Reading & Sources
- Moving an Aquarium: How to Move a Fish Tank Safely
- How to Move an Aquarium
- How to Move a Fish Tank Safely
- Moving an aquarium – how to move tank safely
- How To Move A Fish Tank Without Harming Your Fish
Lia is an expert in aquarium and pet fish care. Having worked in the marine industry and having cared for multiple pet fish, she has acquired first hand expertise on aquarium care, maintenance and setup. She always brings her practical expertise and science to help solve any aquarium related queries.
DIY Projects